SpringBoot启动过程分析
SpringBoot的出现给我们带了许多的便利性,其中一点就是可以内置tomcat,从而实现从jar包直接运行,那么SpringBoot是怎么实现的呢?
嵌入式tomcat
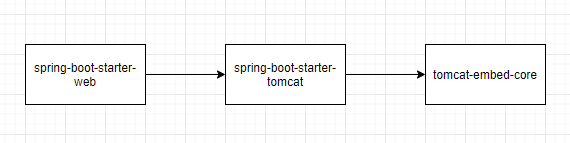
在一个简单的SpringBoot项目中,我们只需要在项目中添加spring-boot-starter-web依赖,然后通过SpringApplication.run方法就可以启动一个web服务。查看spring-boot-starter-web的依赖关系,发现其依赖了tomcat-embed-core,其依赖图如下:
关于tomcat-embed-core,的理解,就像他的名字embed一样,是一个嵌入式的tomcat,他无需构建WAR包到Tomcat服务器中,在项目中引入了这个依赖之后,可以通过该jar包提供的api从而实现一个简单的web服务,示例代码如下:
在pom中引入:
1
2
3
4
5
| <dependency>
<groupId>org.apache.tomcat.embed</groupId>
<artifactId>tomcat-embed-core</artifactId>
<version>8.5.35</version>
</dependency>
|
编写启动类:
1
2
3
4
5
6
7
8
9
10
11
12
13
14
15
16
17
18
19
20
21
22
23
24
25
26
27
28
29
30
31
32
33
| package top.jiangliuhong;
import org.apache.catalina.Context;
import org.apache.catalina.LifecycleException;
import org.apache.catalina.startup.Tomcat;
import javax.servlet.ServletException;
import javax.servlet.http.HttpServlet;
import javax.servlet.http.HttpServletRequest;
import javax.servlet.http.HttpServletResponse;
import java.io.File;
import java.io.IOException;
import java.io.Writer;
public class EmbedTomcatTest {
public static void main(String[] args) throws LifecycleException {
Tomcat tomcat = new Tomcat();
tomcat.setPort(8081);
final Context context = tomcat.addContext("/", new File(".").getAbsolutePath());
Tomcat.addServlet(context, "MVC", new HttpServlet() {
@Override
protected void service(HttpServletRequest req, HttpServletResponse resp) throws ServletException, IOException {
Writer w = resp.getWriter();
w.write("Embedded Tomcat servlet.\n");
w.flush();
w.close();
}
});
context.addServletMappingDecoded("/*", "MVC");
tomcat.start();
tomcat.getServer().await();
}
}
|
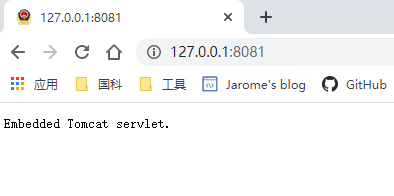
访问8081端口效果如下:
这里我使用的是addContext方法,其作用类似tomcat配置文件server.xml中的Context属性;同时这里我是使用直接new了一个HttpServlet作为返回,当然也可以使用addWebapp方法,将一个目录加载到tomcat中,类似于tomcat安装目录下的webapps目录。
SpringMVC去XML
SpringBoot的宗旨是去XML化,在以往项目中,都是配置一个spring的xml文件,然后再在web.xml中配置对应的内容,那么SpringBoot是怎么实现去掉XML呢?结合spring官网对SpringMVC的描述可以很好解释这个问题,官网地址为:https://docs.spring.io/spring-framework/docs/current/reference/html/web.html
在spring官网中这样说道,在Servlet 3.0+环境中,您可以选择以编程方式配置Servlet容器,以替代方式或与web.xml文件结合使用,示例代码如下:
1
2
3
4
5
6
7
8
9
10
11
12
13
14
| import org.springframework.web.WebApplicationInitializer;
public class MyWebApplicationInitializer implements WebApplicationInitializer {
@Override
public void onStartup(ServletContext container) {
XmlWebApplicationContext appContext = new XmlWebApplicationContext();
appContext.setConfigLocation("/WEB-INF/spring/dispatcher-config.xml");
ServletRegistration.Dynamic registration = container.addServlet("dispatcher", new DispatcherServlet(appContext));
registration.setLoadOnStartup(1);
registration.addMapping("/");
}
}
|
WebApplicationInitializer 是SpringMVC提供的接口,在servlet初始化的时候会调用该接口的onStartup方法。其加载的类为org.springframework.web.SpringServletContainerInitializer,ServletContainerInitializer这是servlet3.0新特性提供的接口,servlet3.0是这样规定的:
- 在servlet启动时,会读取
META-INF/services/javax.servlet.ServletContainerInitializer文件,该文件内容为ServletContainerInitializer的实现类的全路径
- 在
ServletContainerInitializer的实现类中可以添加@HandlesTypes注解,然后servlet启动是,会自动扫描对应的类,然后作为onStartup的参数
SpringServletContainerInitializer配置如下:
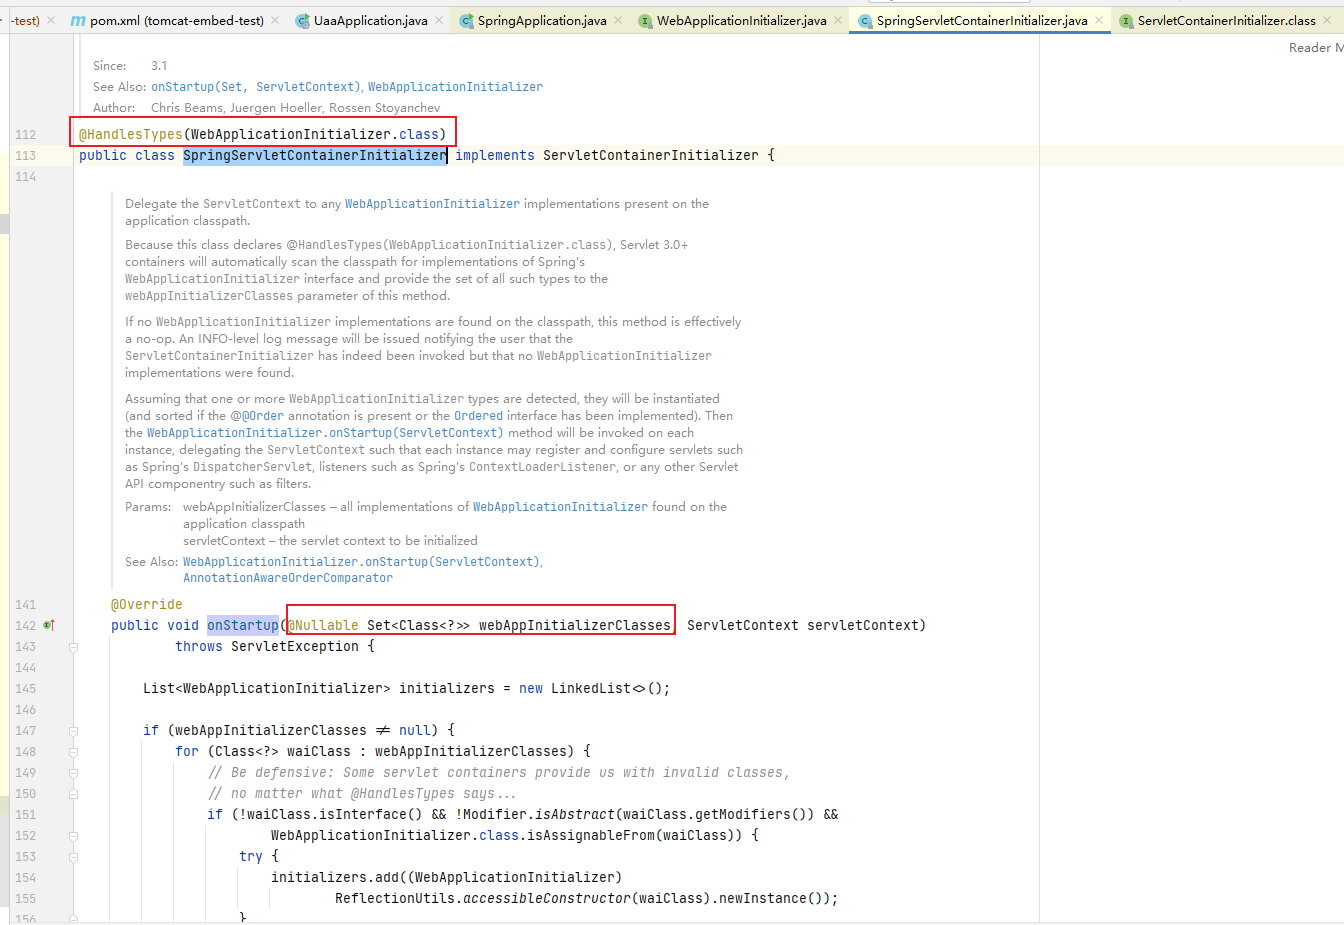
在onStartup中,循环实例化webAppInitializerClasses并调用其onStartup方法
1
2
3
4
5
| servletContext.log(initializers.size() + " Spring WebApplicationInitializers detected on classpath");
AnnotationAwareOrderComparator.sort(initializers);
for (WebApplicationInitializer initializer : initializers) {
initializer.onStartup(servletContext);
}
|
由此可见,基于上述特性,springboot就能够实现SrpingMVC的去XML化,当然不局限于SpringMVC,任意servlet的框架都可以基于3.0的新特性实现去XML化
SpringBoot的run方法
在前面熟悉了嵌入式的tomcat与servlet的去XMl特性后就可以进入本次的主题了,SpringBoot是如何如何通过内置的tomcat启动项目的,在启动SpringBoot项目的时候,一般会是如下代码:
1
2
3
4
5
6
7
| @SpringBootApplication
@EnableDiscoveryClient
public class UaaApplication {
public static void main(String[] args) {
SpringApplication.run(UaaApplication.class);
}
}
|
SpringApplication.run()方法主要流程如下:
1
2
3
4
5
6
7
8
9
10
11
12
13
14
15
16
17
18
19
20
21
22
23
24
25
26
27
28
29
30
31
32
33
34
35
36
37
38
39
40
41
42
43
44
45
46
47
48
49
50
51
52
53
| public ConfigurableApplicationContext run(String... args) {
StopWatch stopWatch = new StopWatch();
stopWatch.start();
ConfigurableApplicationContext context = null;
Collection<SpringBootExceptionReporter> exceptionReporters = new ArrayList<>();
configureHeadlessProperty();
SpringApplicationRunListeners listeners = getRunListeners(args);
listeners.starting();
try {
ApplicationArguments applicationArguments = new DefaultApplicationArguments(args);
ConfigurableEnvironment environment = prepareEnvironment(listeners, applicationArguments);
configureIgnoreBeanInfo(environment);
Banner printedBanner = printBanner(environment);
context = createApplicationContext();
exceptionReporters = getSpringFactoriesInstances(SpringBootExceptionReporter.class,
new Class[] { ConfigurableApplicationContext.class }, context);
prepareContext(context, environment, listeners, applicationArguments, printedBanner);
refreshContext(context);
afterRefresh(context, applicationArguments);
stopWatch.stop();
if (this.logStartupInfo) {
new StartupInfoLogger(this.mainApplicationClass).logStarted(getApplicationLog(), stopWatch);
}
listeners.started(context);
callRunners(context, applicationArguments);
}
catch (Throwable ex) {
handleRunFailure(context, ex, exceptionReporters, listeners);
throw new IllegalStateException(ex);
}
try {
listeners.running(context);
}
catch (Throwable ex) {
handleRunFailure(context, ex, exceptionReporters, null);
throw new IllegalStateException(ex);
}
return context;
}
|
refreshContext
该方法是整个项目启动的核心方法,其执行对象源于createApplicationContext,如果当前应用类型为Servlet,其返回的上下文类型为:org.springframework.boot.web.servlet.context.ServletWebServerApplicationContext,不过最终起作用的还是抽象类里的refresh方法org.springframework.context.support.AbstractApplicationContext#refresh。
在AbstractApplicationContext类中提供了onRefresh方法,其作用是在特定的上下文子类中初始化其他特殊操作。在ServletWebServerApplicationContext类中重写了该方法,其内容如下:
1
2
3
4
5
6
7
8
9
| protected void onRefresh() {
super.onRefresh();
try {
createWebServer();
}
catch (Throwable ex) {
throw new ApplicationContextException("Unable to start web server", ex);
}
}
|
其中createWebServer核心的方法又为factory.getWebServer(getSelfInitializer()),该方法会根据当前上下文环境去获取不同的servlet服务器工厂(org.springframework.boot.web.servlet.server.ServletWebServerFactory)。
servlet服务器工厂列表如下:
- JettyServletWebServerFactory
- TomcatServletWebServerFactory
- UndertowServletWebServerFactory
在ServletWebServerFactory方法中,定义了getWebServer,即嵌入式服务器加载方法,在TomcatServletWebServerFactory工厂的实现逻辑如下:
1
2
3
4
5
6
7
8
9
10
11
12
13
14
15
16
17
18
19
20
| public WebServer getWebServer(ServletContextInitializer... initializers) {
if (this.disableMBeanRegistry) {
Registry.disableRegistry();
}
Tomcat tomcat = new Tomcat();
File baseDir = (this.baseDirectory != null) ? this.baseDirectory : createTempDir("tomcat");
tomcat.setBaseDir(baseDir.getAbsolutePath());
Connector connector = new Connector(this.protocol);
connector.setThrowOnFailure(true);
tomcat.getService().addConnector(connector);
customizeConnector(connector);
tomcat.setConnector(connector);
tomcat.getHost().setAutoDeploy(false);
configureEngine(tomcat.getEngine());
for (Connector additionalConnector : this.additionalTomcatConnectors) {
tomcat.getService().addConnector(additionalConnector);
}
prepareContext(tomcat.getHost(), initializers);
return getTomcatWebServer(tomcat);
}
|
其中prepareContext主要讲tomcat的上下文和spring的上下文合并,其主要步骤为:
- 创建一个
TomcatEmbeddedContext
- 设置一些
TomcatEmbeddedContext必要的属性
- 通过
mergeInitializers方法合并方法传入ServletContextInitializer
- 方法传入的
ServletContextInitializer[] initializers为Spring的上下文
- 在
configureContext方法中将上下文与tomcat进行绑定
到此,内置tomcat启动就已经完成了。
构建并部署war
通过官方文档,如果需要构建并部署war文件时,需要使用WebApplicationInitializer,由于该类是个抽象类,所以需要继承该类;当然也可以直接实现WebApplicationInitializer接口
补充说明
getSpringFactoriesInstances说明
该方法的源码为:
1
2
3
4
5
6
7
8
| private <T> Collection<T> getSpringFactoriesInstances(Class<T> type, Class<?>[] parameterTypes, Object... args) {
ClassLoader classLoader = getClassLoader();
Set<String> names = new LinkedHashSet<>(SpringFactoriesLoader.loadFactoryNames(type, classLoader));
List<T> instances = createSpringFactoriesInstances(type, parameterTypes, classLoader, args, names);
AnnotationAwareOrderComparator.sort(instances);
return instances;
}
|
其中比较重要的方法是SpringFactoriesLoader.loadFactoryNames(type, classLoader),通过该方法能够定位到loadSpringFactories方法,熟悉SpringBoot的starter工作原理的应该知道,在每个starter包里都有META-INF/spring.factories文件,而loadSpringFactories的作用就是加载这些文件为自动装配服务。
SpringApplicationRunListener方法说明
1
2
3
4
5
6
7
8
9
10
11
12
13
14
15
16
17
18
19
20
21
22
23
24
25
26
27
28
29
30
31
32
33
34
35
36
37
38
| public interface SpringApplicationRunListener {
void starting();
void environmentPrepared(ConfigurableEnvironment environment);
void contextPrepared(ConfigurableApplicationContext context);
void contextLoaded(ConfigurableApplicationContext context);
void started(ConfigurableApplicationContext context);
void running(ConfigurableApplicationContext context);
void failed(ConfigurableApplicationContext context, Throwable exception);
}
|