主从同步 MySQL 官方提供的同步方案,用于将一个 MySQL 的实例同步到另一个实例中。Replication 为保证数据安全做了重要的保证,是目前运用最广的 MySQL 容灾方案。Replication 用两个或以上的实例搭建了 MySQL 主从复制集群,提供单点写入,多点读取的服务,实现了读的scale out。
主从介绍 实现原理:
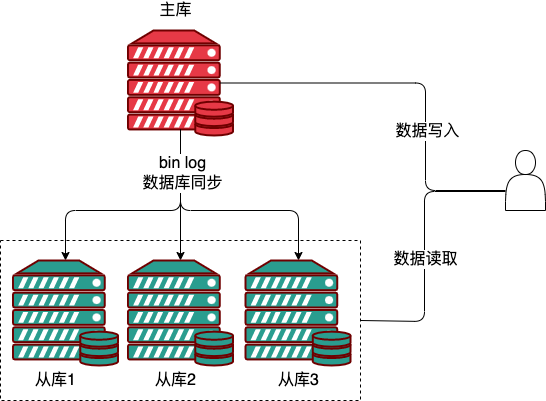
在主从复制中,从库利用主库上的 binlog 进行重播,实现主从同步,复制的过程中蛀主要使用到了 dump thread,I/O thread,sql thread 这三个线程:
IO thread: 在从库执行 start slave 语句时创建,负责连接主库,请求 binlog,接收 binlog 并写入 relay-log;
dump thread:用于主库同步 binlog 给从库,负责响应从 IO thread 的请求。主库会给每个从库的连接创建一个 dump thread,然后同步 binlog 给从库;
sql thread:读取 relay log 执行命令实现从库数据的更新。
主从同步优点:
通过读写分离实现横向扩展的能力,写入和更新操作在源服务器上进行,从服务器中进行数据的读取操作,通过增大从服务器的个数,能够极大的增强数据库的读取能力;
数据安全,因为副本可以暂停复制过程,所以可以在副本上运行备份服务而不会破坏相应的源数据;
方便进行数据分析,可以在写库中创建实时数据,数据的分析操作在从库中进行,不会影响到源数据库的性能;
配置主从同步 编写启动主从集群需要的配置文件:
docker-compose.yml
1
2
3
4
5
6
7
8
9
10
11
12
13
14
15
16
17
18
19
20
version: '3' services: mysql-master: restart: always environment: - MYSQL_ROOT_PASSWORD=root image: "mysql:8.0" volumes: - ./master.cnf:/etc/mysql/my.cnf ports: - "10301:3306" mysql-slave: restart: always image: "mysql:8.0" environment: - MYSQL_ROOT_PASSWORD=root volumes: - ./slave.cnf:/etc/mysql/my.cnf ports: - "10302:3306"
master.cnf
1
2
3
4
5
6
7
8
9
10
11
12
13
[mysqld] server-id=10 # 开启 binlog log_bin=master-bin log_bin-index=master-bin.index # 允许最大连接数 max_connections=200 # 允许连接失败的次数 max_connect_errors=10 # 服务端使用的字符集默认为UTF8 character-set-server=utf8 # 创建新表时将使用的默认存储引擎 default-storage-engine=INNODB
slave.cnf
1
2
3
4
5
6
7
8
9
10
11
12
13
14
15
16
17
18
[mysqld] # 主库和从库需要不一致 server-id=11 # 打开MySQL中继日志 relay-log-index=slave-relay-bin.index relay-log=slave-relay-bin # 打开从服务二进制日志 log-bin=mysql-bin # 使得更新的数据写进二进制日志中 log-slave-updates=1 # 允许最大连接数 max_connections=200 # 允许连接失败的次数 max_connect_errors=10 # 服务端使用的字符集默认为UTF8 character-set-server=utf8 # 创建新表时将使用的默认存储引擎 default-storage-engine=INNODB
拉起服务后,进入主节点容器,创建用于同步的账号:
1
2
3
CREATE USER 'slave'@'%' IDENTIFIED BY 'password'; GRANT REPLICATION SLAVE, REPLICATION CLIENT ON *.* TO 'slave'@'%';
查看主节点状态:
进入从节点容器,执行命令,链接主节点:
1
2
3
4
5
6
7
CHANGE MASTER TO master_host = 'mysql-master', master_user = 'slave', master_password = 'password', master_port = 3306, master_log_file = 'master-bin.000003', master_log_pos = 712, master_connect_retry = 30;
注意:
master_host为docker容器的名称,如果不是使用的docker部署,需要改为实际的主节点ip。master_log_file与master_log_pos的值来源于show master status的执行结果。
启动主从同步:start salve (对应的停止同步为stop salve)。
查看从节点状态:
打印如下则代表启动成功(启动失败时,会打印响应的错如日志,根据日志进行解决即可):
1
2
Slave_IO_Running: Yes Slave_SQL_Running: Yes
测试主从同步,在主节点执行命令:
1
2
3
4
create database testdb; use testdb; create table t_user(id int,name varchar(200),primary key(id)); insert into t_user (1,'name');
在从节点执行查询sql:
执行结果如下,证明主从同步配置成功:
1
2
3
4
5
6
+----+------+ | id | name | +----+------+ | 1 | name | +----+------+ 1 row in set (0.00 sec)
springboot 配置mysql主从集群 源码参考:https://github.com/jiangliuhong/olcp/blob/master/olcp-common/olcp-common-db/src/main/java/top/jiangliuhong/olcp/common/DatasourceClusterConfig.java
定义动态切换的数据源
1
2
3
4
5
6
public class RoutingDataSource extends AbstractRoutingDataSource { @Override protected Object determineCurrentLookupKey () { return ClusterDBContext.get(); } }
创建集群数据库上下文 ClusterDBContext
1
2
3
4
5
6
7
8
9
10
11
12
13
14
15
16
17
18
19
20
21
22
23
24
25
26
27
28
29
30
31
32
33
34
35
36
37
38
39
40
41
42
43
44
45
46
47
48
49
50
51
52
53
54
55
@Slf4j public class ClusterDBContext { private static final ThreadLocal<String> dbContext = new ThreadLocal <>(); private static final AtomicInteger counter = new AtomicInteger (-1 ); public static final Map<Object, Object> dataSources = new HashMap <>(); private static final List<String> masterKeys = new ArrayList <>(); private static final List<String> slaveKeys = new ArrayList <>(); public static void registry (String key, Object obj) { dataSources.put(key, obj); if (StringUtils.startsWith(key, "master" )) { masterKeys.add(key); } else { slaveKeys.add(key); } } public static Object getDefaultMaster () { if (masterKeys.isEmpty()) { throw new RuntimeException ("not found master datasource" ); } return dataSources.get(masterKeys.get(0 )); } public static void set (String dbType) { dbContext.set(dbType); } public static String get () { return dbContext.get(); } public static void master () { int index = counter.getAndIncrement() % masterKeys.size(); String slaveKey = masterKeys.get(index); log.debug("change master datasource ,use {}" , slaveKey); set(slaveKey); } public static void slave () { if (slaveKeys.isEmpty()) { log.warn("not found slave datasource,use master" ); master(); return ; } int index = counter.getAndIncrement() % slaveKeys.size(); String slaveKey = slaveKeys.get(index); log.debug("change slave datasource ,use {}" , slaveKey); set(slaveKey); } }
创建springboot自动装配类
1
2
3
4
5
6
7
8
9
10
11
12
13
14
15
16
17
18
19
20
21
22
23
24
25
26
27
28
29
30
31
32
33
34
35
36
37
38
39
40
41
42
43
44
@Setter @Configuration @ConfigurationProperties(prefix = "spring.datasource") @ConditionalOnProperty(value = "spring.datasource.enable-cluster", havingValue = "true") public class DatasourceClusterConfig { private Map<String, DataSourceProperties> cluster = new HashMap <>(); @Bean public List<DataSource> dataSources (@Autowired DataSourceProperties dataSourceProperties) { List<DataSource> list = new ArrayList <>(); ClusterDBContext.registry("master0" , createDataSource(dataSourceProperties)); this .cluster.forEach((key, val) -> { DataSource dataSource2 = createDataSource(val); ClusterDBContext.registry(key, dataSource2); }); return list; } private DataSource createDataSource (DataSourceProperties properties) { DriverManagerDataSource dataSource = new DriverManagerDataSource (); dataSource.setUrl(properties.getUrl()); dataSource.setUsername(properties.getUsername()); dataSource.setPassword(properties.getPassword()); dataSource.setDriverClassName(properties.getDriverClassName()); return dataSource; } @Bean @Primary @DependsOn("dataSources") public DataSource routingDataSource () { RoutingDataSource routingDataSource = new RoutingDataSource (); routingDataSource.setDefaultTargetDataSource(ClusterDBContext.getDefaultMaster()); routingDataSource.setTargetDataSources(ClusterDBContext.dataSources); return routingDataSource; } @Bean public DataSourceAop dataSourceAop () { return new DataSourceAop (); } }
通过以上配置,在springboot启动的时候,会将routingDataSource作为默认的datasource运行。
为达到动态切换数据源的目录,可以有两种方式:
通过切面,自动对查询类、修改类方法自动切换数据源
定义 @Master 注解,所有被该注解修饰的类均使用master数据源
定义@Master
1
2
public @interface Master {}
定义切面
1
2
3
4
5
6
7
8
9
10
11
12
13
14
15
16
17
18
19
20
21
22
23
24
25
26
27
28
29
30
31
32
33
@Aspect public class DataSourceAop { @Pointcut("@annotation(top.jiangliuhong.olcp.common.annos.Master) " + "|| execution(* top.jiangliuhong.olcp.*.service..*.insert*(..)) " + "|| execution(* top.jiangliuhong.olcp.*.service..*.save*(..)) " + "|| execution(* top.jiangliuhong.olcp.*.service..*.add*(..)) " + "|| execution(* top.jiangliuhong.olcp.*.service..*.update*(..)) " + "|| execution(* top.jiangliuhong.olcp.*.service..*.edit*(..)) " + "|| execution(* top.jiangliuhong.olcp.*.service..*.delete*(..)) " + "|| execution(* top.jiangliuhong.olcp.*.service..*.remove*(..))") public void writePointcut () { } @Pointcut("!@annotation(top.jiangliuhong.olcp.common.annos.Master) " + "&& (execution(* top.jiangliuhong.olcp.*.service..*.select*(..)) " + "|| execution(* top.jiangliuhong.olcp.*.service..*.query*(..)) " + "|| execution(* top.jiangliuhong.olcp.*.service..*.get*(..)))") public void readPointcut () { } @Before("writePointcut()") public void write () { ClusterDBContext.master(); } @Before("readPointcut()") public void read () { ClusterDBContext.slave(); } }
数据源配置
1
2
3
4
5
6
7
8
9
10
11
12
13
14
15
16
17
18
19
20
21
22
23
24
25
spring: datasource: url: jdbc:mysql://127.0.0.1:10301/olcp?useUnicode=true&characterEncoding=utf-8&useSSL=false&allowPublicKeyRetrieval=true username: root password: root driver-class-name: com.mysql.cj.jdbc.Driver enable-cluster: true cluster: master1: url: jdbc:mysql://127.0.0.1:10302/olcp?useUnicode=true&characterEncoding=utf-8&useSSL=false&allowPublicKeyRetrieval=true username: root password: root driver-class-name: com.mysql.cj.jdbc.Driver slave0: url: jdbc:mysql://127.0.0.1:10303/olcp?useUnicode=true&characterEncoding=utf-8&useSSL=false&allowPublicKeyRetrieval=true username: root password: root driver-class-name: com.mysql.cj.jdbc.Driver slave2: url: jdbc:mysql://127.0.0.1:10303/olcp?useUnicode=true&characterEncoding=utf-8&useSSL=false&allowPublicKeyRetrieval=true username: root password: root driver-class-name: com.mysql.cj.jdbc.Driver
通过上面的切面配置,当方法名是select、query、get开头、没有被@Master修饰的方法或者是方法名不被writePointcut匹配时,将默认使用slave数据源
参考链接:https://zhuanlan.zhihu.com/p/80350536